
Last weekend was the first one when I was able to work relatively unhindered on Wildheart’s renovations, and I got a LOT done. I never get as much done as I wish I would or expect to, but nevertheless, I did plow through a good bit of the nitty-gritty basics.
Saturday was unexpectedly warm and sunny, and I took advantage of the bright light and dry conditions to finish up relocating the rest of the electrical controls and outlets. I needed to do those when it was light enough to see without having the trailer lights on, because for safety reasons, I disconnected the battery while I was working on all of it.
Power Outlet Relocation
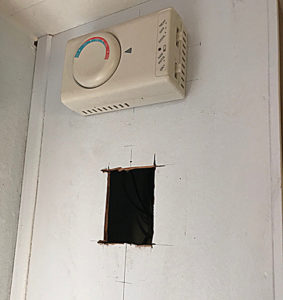
First I tackled the piece that gave me the most trepidation: the 110v power outlet. Though it was quite similar to those used in stationary (or “sticks-and-bricks” as they’re known in RVer lingo) buildings, it was a bit smaller and the connections were different, but that wasn’t what concerned me. I was pretty confident about the receptacle itself, but I wanted to relocate it down on the footwall of the bottom bunk. That meant cutting into that wall, on the other side of which was the refrigerator wall and the wiring chase. There was a very good possibility I would cut into something I didn’t want to, which could cause me to have to repair or replace expensive things.
However, I did the best homework I could without having an owner’s manual to refer to. By removing the vent cover on the outer wall behind the fridge, I was able to feel, if not completely see, where most of the wires went, though the ones running up that particular wall were covered with a layer of pink fiberglass insulation (ouch and itchy).
I did know, from examining closely several of the other inner and outer walls, that they were roughly an inch thick and made of a sandwich of EPS rigid insulation (“styrofoam”) between two pieces of 1/8″ composite board. That told me there was something substantial to screw into for fastening purposes, before I would reach the back and risk puncturing the outer wall of the fridge. I just needed to be careful to use the proper length screw.
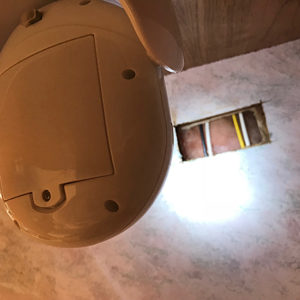 So, I took a deep breath and started cutting a hole into the upper right corner of that wall, beneath the top bunk. That’s where I would position the outlet to be used by my flat screen TV and Roku box. I was happy to cut into the ugly original wallcovering, but it was dark down there, so I used some Command strips to temporarily attach a battery-operated LED light beneath the top bunk to give me some illumination.
 Access was really awkward, and I was concerned about not being physically able to manage a straight cut. Sure enough, using my portable power drill to start the hole, followed by a jigsaw to cut through the composite board and a thin sheet of paneling that formed the outer wall of the wire chase, I didn’t manage to get the hole completely straight. But it wasn’t a big deal: once I have the flatscreen attached to the wall, the outlet itself will be hidden. Function is more important than cosmetics in this case, though I can always go back in and straighten it if that feels important enough to warrant a lot of time and painstaking hand work.
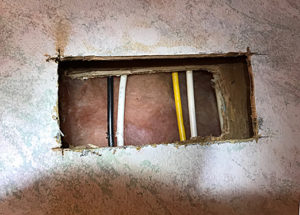
After checking to make sure I hadn’t caused any serious damage when cutting blind (the saw blade did scuff the rubber wire jacket in a couple places, as you can see in the photo above. Not enough to go all the way through, but I wrapped those areas in electrical tape nevertheless, just to be safe). Now it was time to bring the receptacle itself down through the hole.
This was a serious challenge, with the mesh of wires in the chase, and the pink insulation barrier keeping me from even being able to see what I was doing. There were only a few smallish holes in the backboard at top, where all components had previously been mounted, and I couldn’t see through those far enough down to where I wanted to place the outlet. Neither could I see up to where the receptacle currently hovered, held in place by its stiff wiring, which I didn’t want to mess with. Leaving it connected was by far the better decision, so as not to inadvertently introduce any new issues.
So I unbent the clothes hanger I’d brought out the day before, and fashioned a makeshift fish tape—the kind professional electricians use for the same purpose, to run wires from one room to another when they can’t see what’s in between the two locations. I pushed it up through the wire chase, and it took a few tries before I could see and pull it through one of the small holes at top. I did so, attaching it pretty tightly through the fastener hole, and fed it back through the hole. Then I pulled from below; slowly, as not to tear or pull anything out of position along the way.
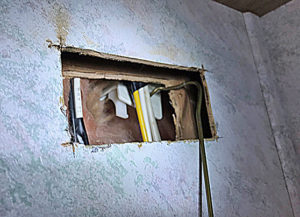 Finally, I could see the end of it poking below the insulation, and it took me a good bit of turning and yanking with a pair of needle-nose pliers to pull it all the way through the new hole, since I’d made it barely big enough for the receptacle to fit through. I yanked on the wires to make sure I hadn’t loosened anything during the trip down. Satisfied that all was as it should be, I removed the hanger, mounted it to the wall with two screws, and attached the bezel for a nice, finished look. (Notice the lovely original wallcovering. That’s gotta go…)
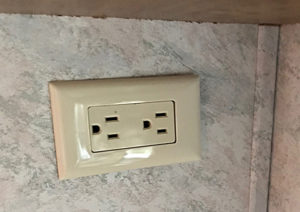 Voila! Power down below. You can see the results of the crooked cut here, but I can live with it. I finished by noon and had a bit of lunch, resting my neck from all the squinching around beneath the top bunk. That was seriously uncomfortable and I had to rest frequently while I was working, making it take probably twice as long as it otherwise would have—the joys of working in a confined space.
12 Volt Receptacle Relocation
Finally, it was time to move the last of the three electrical components. I turned the 12v receptacle around, so I could see how the two coax cables and the black and white neg/pos power wires were hooked up. I took the photo at lower left to use as reference, to make sure I’d hook them up properly again, since there was no avoiding removing them for the move.
 Because this one would be in plain view all the time, like the furnace controller, I was careful to measure placement of that, as well. The lines I drew on the wall would be covered up later by paint or wallpaper, so I didn’t care about those.
I also used the cutoff wheel of my Dremel rotary tool to actually cut the hole. It did a much neater job than the jigsaw, and was far easier to control. Since the Dremel and jigsaw are plug-in tools, I ran those off a 150w inverter I had plugged into the lighter outlet on my Jeep’s dashboard. I had parked it right next to the trailer for this express purpose.
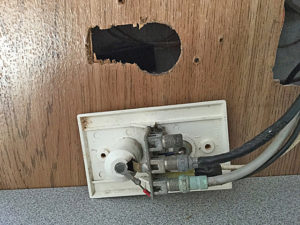 Once I had the cables and wires removed, I used a combination of an old toothbrush and a can of compressed air to blow years of accumulated dirt and debris from the back of the receptacle. I believe in cleaning stuff when you have the chance, and situations like this offer the perfect opportunity. I also greased the coax cable connections, since you can see by the photo that some oxidation and corrosion had begun to form on one of them. That’s no good, and a light coating of white lithium grease is just the thing to protect it from further deterioration.
It turned out the two cables were attached to the opposite side of the chase with a wire guide, so they couldn’t reach. I was able to slip a slotted screwdriver beneath that and pry it up to free them, which worked well. But the two power wires were simply not long enough, so I had to go over to my off-site workshop to retrieve some spare wire of the same gauge (which I had pack-ratted away years ago), some connectors, and some heat-shrink tubes.
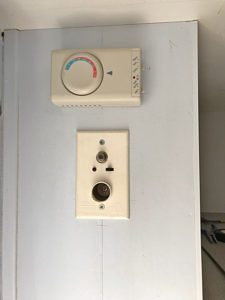 When I got back, I cut the original wires and spliced in some of the saved wire. When finished splicing, I covered the splices with shrink tubing and electrical tape, to make sure they would stay together during the constant seismic loads being transmitted through the whole rig on bumpy roads. For the same reason, I used longer pieces of wire for the splice than necessary, to take any strain off them and make sure they’d stay connected. Thus extended, the wires were pulled through the new hole and reattached to the receptacle. I screwed the unit in just below the furnace controller on the outside wall of the chase. This completed the electrical relocations. Whew! I’m pretty confident with basic electrical work like this, but it’s still always nervous-making till I can test it out.
That’s It For Now
Having finished the wiring jobs, I used my small 12v vehicle vacuum unit (which works surprisingly well!) to clean out all the cuttings and road debris from the wire chase, then replaced the vent cover. The sun was starting to go down and I was tired.
I still needed to get to the store, to see if I could find something to use as a food storage pantry atop the fridge. I had wanted to use one of the many primitive wood boxes I’ve collected over the years, but the only one that really fit anywhere close to the available space wouldn’t accommodate the antenna crankshaft from the ceiling, and was too short width-wise. I couldn’t afford to lose that storage space, and also decided to avoid the added weight of a wood box, so something else would have to be done.
I cleaned up the workspace and took off to go storage shopping. The next day would be about installing whatever I found for that purpose, replacing worn weatherstripping around the entry door, and creating some sort of replacement for a missing vent clip that had allowed water entry during the last two nor’easter storms.
Recent Comments