
Last Sunday dawned gray and with a few brisk gusts. Great. A chilly, breezy day in which a good bit of my work would need to be outside. Of course.
 Well, there was nothing to be done about it, so I went out after breakfast and got right to pulling away the worn and deteriorating open-cell foam weatherstripping around the entry door on my trailer. It may have even been the original stuff, but I rather doubt it. That open-cell stuff doesn’t tend to last long. It looks good when it’s new, but even then, it does a less-than-stellar job at stopping drafts and leaks, because it just doesn’t offer enough surface area to catch it all, even when compressed by the closed door. And the open-cell structure doesn’t have the durability that closed-cell foam has.
So I used a putty knife to gently scrape away the crumbling foam (time and sunlight really do a number on any kind of synthetic foam), switching over to a plastic blade when needed to keep from scraping through the paint to the bare aluminum.
I got the bulk of it that way, then went back over it a second time by squirting rubber cement thinner on the remainder that was still clinging stubbornly to the channel. TIP: Bestine rubber cement thinner is an AWESOME gummy adhesive remover. It works WAY fast, you use far less of it than a product such as, say, Goo Gone, and it evaporates quickly, leaving no oily residue or staining. That said, I recommend not using it without rubber gloves, and only working with it in well-ventilated areas. Bestine contains toluene, a powerful nerve toxin. And don’t use it around your pets, for obvious reasons.
Even though it worked relatively quickly, I had a lot of space to cover, so that job took me up through lunch to finish. I then replaced the old stuff with peel-and-stick 3/8″ closed-cell foam weatherstripping. I could have gotten away with one course of it, but the old stuff had been 1/2″ and I wanted to be safe, so I used two side-by-side courses. The replacement stuff I’d bought years ago at a yard sale, so I’m not sure how long it will last, but it’s working for now. And if it does need replacing, it will come off a lot easier than that first stuff did, because the closed-cell stripping doesn’t crumble so easily, and the newer foam retains its stretchiness.
Figuring Out The Pantry
The night before, I had gone to the store to get some storage ideas, and found the perfect solution for the pantry container. I had wanted to avoid just another cupboard, both the boring look and the weight. And if I were going to use something that slid in, instead of being built-in, it would need to accommodate the crankshaft from the ceiling-mounted antenna immediately above it, because I wasn’t going to remove that, as I explained in a previous post.
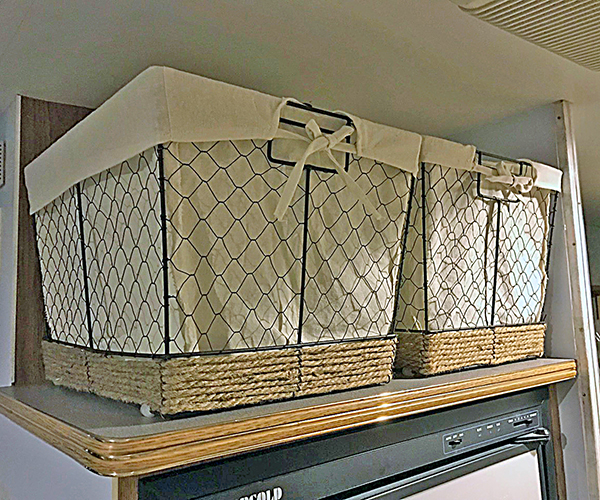
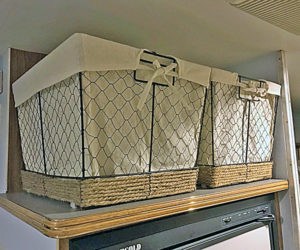 I had not seen anything that I felt would both be functional and nice-looking, and I had almost given up on finding something, when I came around the corner and saw the PERFECT solution: two rustic-looking black wire baskets with sisal-wrapped bottoms and lined with a white cotton apron of sorts.
Not only were they the right size (I had carefully measured the available space before leaving), but they were also cute as heck, and would go well with the Southwest-y look I was going for. That, plus two of them side-by-side would manage to avoid the ceiling crankshaft, AND weigh next to nothing!
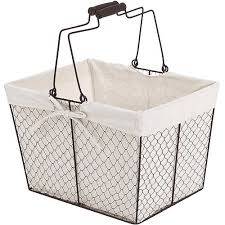 On top of all this excellence, there were only three left, as they were on clearance to make room for this new design, which eliminates the sisal bottom wrap in favor of the addition of wire bail handles. These are cute, but the handles would make them not fit or work right for my purposes, so I was tickled pink: Not only had I avoided that problem, but the ones I got were on sale. Perfect functionality, looks and on sale? Oh, yes, please!
I love the way they look, and once the interior is painted to get rid of all the blue, they will be perfect, perfect, perfect! All I have to do is attach a few eye hooks on the bulkhead and the wire chase, and when I’m traveling, I will attach some short bungee cords of the more attractive variety to corral and keep them in place while in transit.
Fixing the Vent Cover Clip
It was dark now, but I still needed to replace the missing retention clip on the oven vent cover. During the FOUR recent nor-easters, when the wind was blowing from, well, the northeast (our usual is the prevailing westerlies, as in most places in America), the brutal gusts had driven rain into the vent by blasting the cover open.
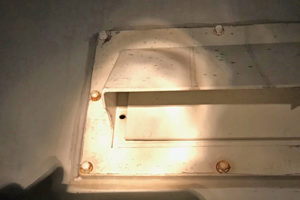 The single right retaining clip hadn’t been able to stand up to that kind of force. So now, I needed to replace the missing left one, since yet another potent storm was forecast for the following day, because the water entry had caused the wallcovering behind the stove to pull away and ripple.
 I was going to have to finish tearing it off before I could install the remainder of the backsplash, but I sure didn’t want to allow any fresh leakage. So when I’d gone to the store, I’d hunted for a replacement clip and hadn’t had any luck. But knowing I couldn’t wait any longer, I’d found something to improvise with.
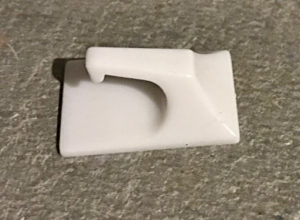
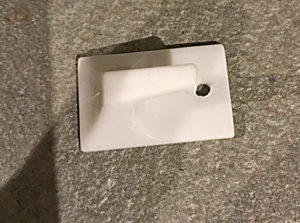 I’d located a package of two plastic wall hooks for $1.49. They were small, white and the hook would function as something to hold onto and manipulate it with. I realized one of those would work until I could find something more attractive and permanent. So I drilled a hole in the base of one, which would allow me to attach it using the existing fastener hole.
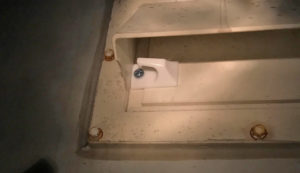 I chose a screw from a boxed assortment I keep in the trailer and screwed it into the hole, making sure to position it properly over the vent cover. I tested it to make sure it would hold, and was satisfied my makeshift clip was a success. The proof came a couple days later, when I went out to check for new leaks. Dry as a bone…success! And all for about 75¢. I’ll take that.
It will remain in place until I can get to a proper hardware store to find a real swivel retainer clip. Thankfully, there is Wehrung’s down in Ottsville, and Moninghoff’s right across the river. If I can’t find it there, I’ll cruise down to Finkel’s in Lambertville. If they don’t have it, it doesn’t exist!
Thanks for sharing Mary. You are amazing.
Thanks, Sandy. 🙂 Interestingly, when I said all the electricity I know I learned in seventh-grade science? That class was taught by your brother, Jim!
Love the baskets, perfect all around. It is going to be a perfect home. Enjoy.