
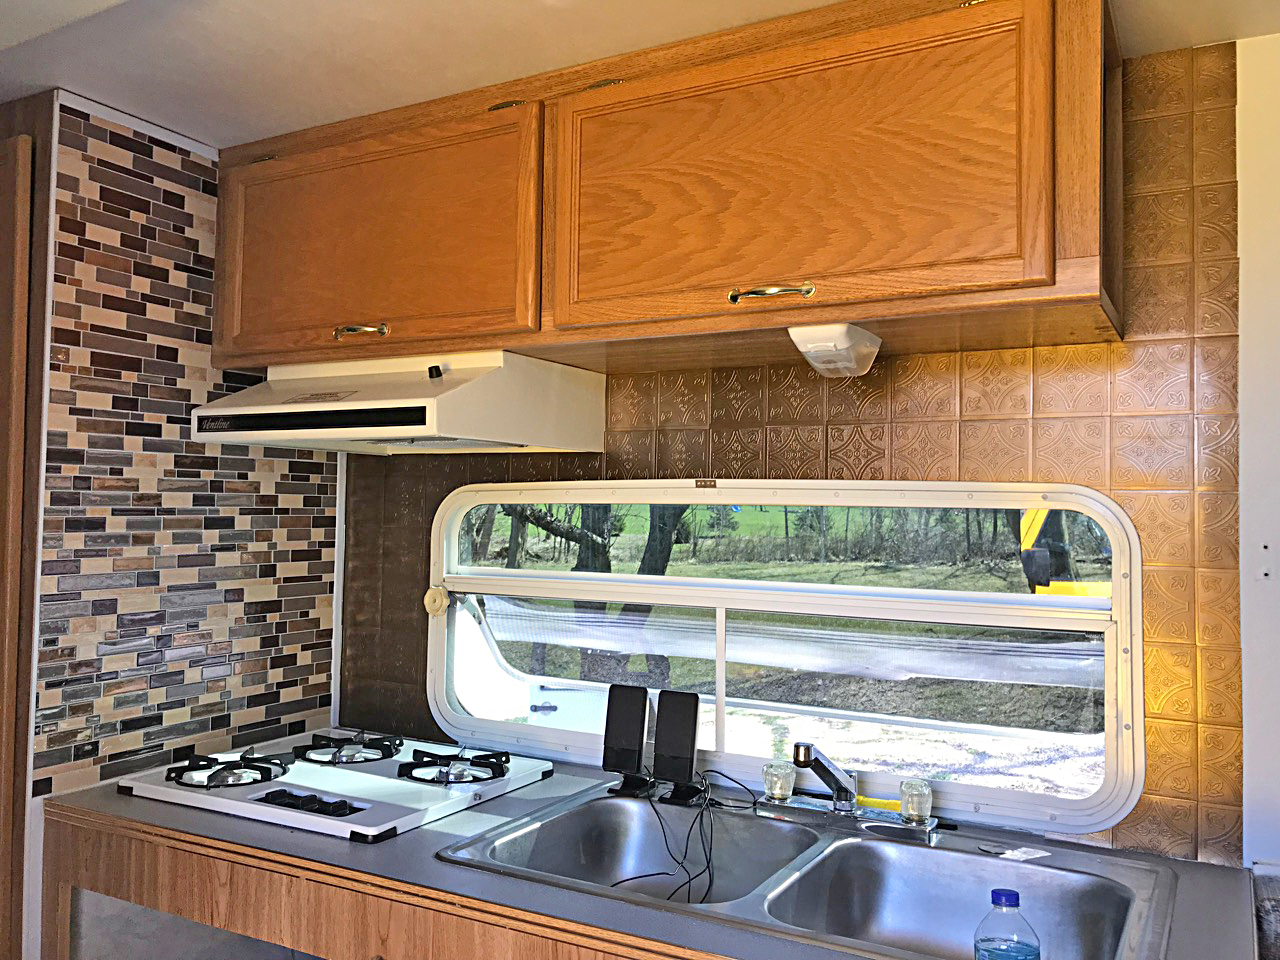
A few posts ago, I described putting up the epoxy tile on the sidewall of my kitchen backsplash. I still love how it looks. Unfortunately, I could not find any more of the same tile because it turns out the reason I got such a good deal on it was that it was a closeout. In one way, this turned out to be a sort of blessing in disguise. Had I been able to get it, I would have put it up and THEN discovered the leak from my stovetop vent, which would have made me have to tear it all back off, dry out the wall, and re-do it. That would have been one expensive PITA.
As it actually went, I was able to clearly see the leak rippling the old wallcovering, which led me to discover where it was coming from. I’ll do another post about how I permanently fixed that, but first, I want to describe the process of applying the rear backsplash.
Finding The Right Stuff
It started with finding just the right material. I needed something that would hold its own, designwise, and not look too wimpy next to that beautiful epoxy tile. But it also couldn’t fight for visual dominance. The epoxy pattern was definitely going to be the star of the show, but whatever I chose for the rear wall had to strike just the right balance. Plus it had to be exactly the right color, or it would just look awful.
It was the latter challenge that took so long, mainly because I have learned not to trust screen-rendered color on computer monitors. I don’t care how well-calibrated your monitor is, between varying levels of quality of original images and the inevitable color shifts in rendering with light compared to printed ink, you just have to take screen colors with a very large grain of salt. Like, the size of a deer lick.
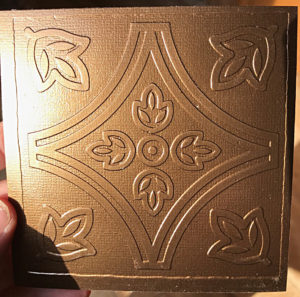
Metallo vinyl tile. They call it “copper” color, but I think it’s more like bronze—perfect!
So…it took me some time. But I finally located what I thought would be perfect. They were faux metal tiles actually made of vinyl, patterned like old ceiling tiles but quite a bit smaller, 4 inches square like standard wall tile. The manufacturer called their color “copper,” and that intrigued me, because I wanted the warmth of copper.
However, the StickTiles I put up for the epoxy sidesplash were a bit cooler in tone. So I knew what I really needed was something more like bronze, but not too bronze-y: In other words, too green to be copper, too red to be bronze. Oh, yes…I knew exactly what I needed. But could I find it among all the untrustworthy screen renderings?
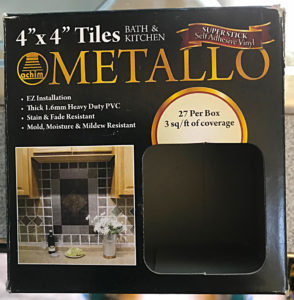
They come 27 tiles to a box, 3 sq. feet.
In fact, yes. I found these Metallo tiles, and I carefully read through all the user reviews until I found what I was looking for: Someone complaining that the color was too greenish to look like true copper. CLICK! Two boxes immediately went into my shopping cart. Even though a great deal of the backsplash wall was taken up by the window, I still knew I was pushing it by only buying two boxes. But they weren’t cheap, and I didn’t want to have a ton of them left over.
As it turned out, I ruined maybe 4-5 of them, and at the end, I had exactly ONE tile left over. And that was only because I stopped to think about it, and even though I would have liked to have 2-1/4 inch widths on the last column, I only had enough tiles left to split several of them exactly in half. I fretted for a bit about that, until I realized that a quarter-inch was maskable by using a bit wider of a finishing trim piece than originally planned. And you know what? When I got it home to measure the proper length, I realized it was perfect: The thinner width I’d originally imagined would have been proportionally too small, and looked like a lame afterthought. Sometimes fate knows better than we do, and interferes on our behalf, when our better judgment fails us. At least in this case.
Getting Started
First, I had to prime the wall behind the stove, sink and countertop, which was now bare wood where I had pulled away all the original wallcovering to expose the damp wood and let it dry out from the leak. I used Kilz white primer. It dried quickly, and since I had worked from the bottom up, I was able to start sticking up the tiles at the starting end while the last-painted surfaces were still drying.
Getting started was easy: Peel, position, stick!
That went quickly, and I soon had a few courses up, enough to be able to imagine how the finished backsplash would look. And I liked what I saw. I had absolutely NAILED that color, and the metallic sheen was just enough to enliven the surface and reveal detail, without overpowering the sidesplash pattern. It was really the perfect choice. I was so happy!
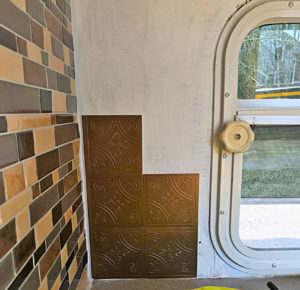
It wasn’t long before I had peeled the backing paper off of enough whole tiles and positioned them in place, that I now had to deal with cutting portions of tiles to fit around the window and upper cupboards. I was immediately glad for the soft, flexible nature of the vinyl, despite its thickness. It allowed me to actually use a simple, sharp pair of long-bladed scissors to do the job, for the most part. This was especially important to being able to do the critical, close-tolerance cutting around the radiused-corner windows.
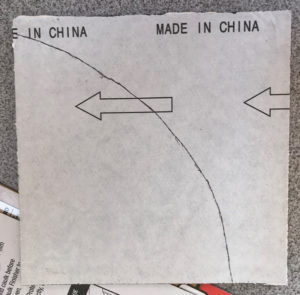
Pattern drawn on peel-off backing paper
What ended up being most difficult about those areas was getting the pattern accurately drawn out. I sat and thought about that for a good bit before trying anything. I knew I had two choices: Get a bunch of tools like a compass and maybe even my old drafting ellipse templates out, and cobble something together while having to do a bunch of daunting math; or, I could weasel out of that onerous task by finding a shortcut.
Guess which approach I picked?
Finding A Shortcut
Yeah, there was not going to be any Nobel prize-winning mathematics going on. There was going to be lazy artist workarounds. So here’s what I came up with:
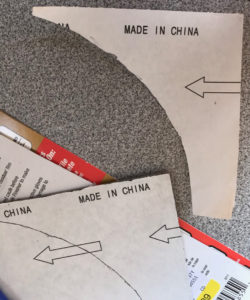
Paper template cut out
The peel-off backing paper was cut to the exact size of each tile, and I realized I could use that far-more-flexible material to stand in for a thick tile during layout. I held the paper up as though it were a tile, positioned it where it should be against the previously adhered courses, then pushed it tightly against the outer window casing. I creased it carefully along the radius lines, then took it over to the table and traced those lines with a pen. I then cut along that line with my very sharp scissors, and took the cut-out paper dummy back over and set it where it would go if it were the actual tile.
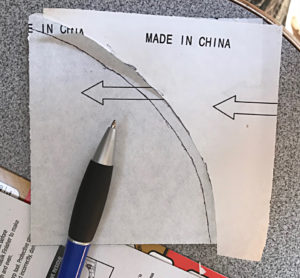
Pattern traced down onto back of tile
It worked! It fit perfectly! Now, if I could just go slowly and carefully enough along that same line, using the paper as a pattern the same way I’d watched my mother cut out fabric using dress pattern pieces for decades, I would have this down. So I took that pattern and laid it along the back of the tile, so that when I cut through, there would be a clean, sharp edge and no kerfing as might happen if I cut from the front. I then painstakingly traced along the edge of the pattern paper.
Oh, no!
Slow and Steady
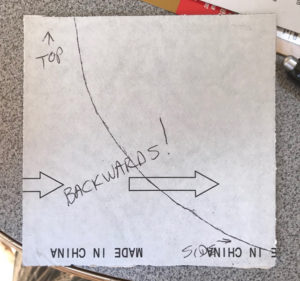
I took one last look at it before I began cutting, and it was a good thing I did. I’m not sure if it was my innate ability to visualize things in my mind before they actually exist—a skill I grew up believing everyone had, which I learned was not at all true—or the skills I picked up from decades of working as a layout artist who had to get very good at seeing how things would fit together inside a given space, but something nagged at me when I looked at that pattern laying on that tile back.
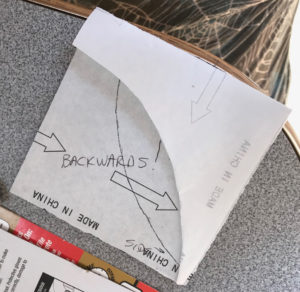
Re-thinking the cut
And then it struck me: because I was going to trace it in reverse, on the back side, the pattern as I was using it was backwards! Now, I could have just cut it from the front and hoped for the best. But I decided instead to flip the paper over and place it on the opposite corner, essentially achieving the same effect.
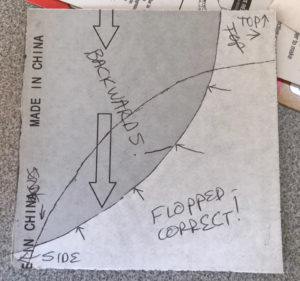
The re-drawn curve. Shaded area is the actual part that will be cut out.
Yes, I could have just left it in the corner it was in, but I was trying to match the outer edge pattern, which was not the same on every tile. So I did it that way, and it worked. I dry-fitted the cut tile in place (see photo), and the cut was nearly perfect. Going slow and being very careful about accuracy had paid off. I peeled off the backing paper and pressed it into place.
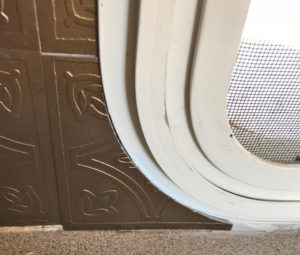
A perfect fit! All I have to do now is push it into place and make sure it’s well stuck-down.
Once I had that process down, things went fairly quickly. I was able to knock out a bunch of coverage in a relatively short period of time. Soon, though, I became aware that the sun was dropping low on the horizon, and I would soon lose my light. But what glorious light it was, at first gold and then finally, red, reflecting beautifully off the wall I was working on.
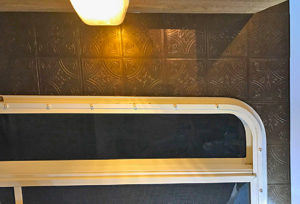
Progress went quickly, once I figured out how to handle the parts around the window.
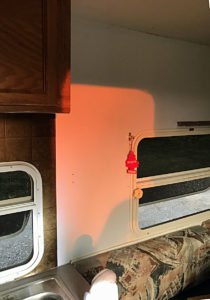
Rosy sunset reflection
Cranking It Out
So I stepped up that pace, still careful, though, to get my cuts right the first time. I knew there was no material to waste, so I measured three or four times before cutting. The end result paid off, I think.
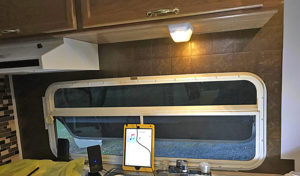
I wound up with a beautiful-looking backsplash of the perfect color and light-reflecting qualities. The right edge remained irregular, so I trimmed the bottom course to match the rest. The right width trim piece would make or break the installation, I knew.
Almost done…
But I wouldn’t be able to get that trim till the next day, and was unlikely to have the time to actually install it until perhaps the following weekend. So I contented myself with how nice it looked even in the raw. The color was perfect, the deep tone providing a fantastic contrast with the epoxy tiles. And just understated enough not to compete with the more showy sidewall.
I can’t wait now to get the trim finished, paint it all a dark brown, mark this project done, and move on to the next one. But I know every time I look at this work when I’m living in that space, I will experience anew the satisfaction that comes from surmounting several significant obstacles to somehow still reach your goal.

Finis! I’m really happy with how this looks, and I can envision it with the trim all in place and painted dark brown for a beautiful frame.
That looks great Mary! Love it!
Thanks, I’m pretty tickled with it so far. ????
It looks beautiful! Exactly what I would have picked! Well done!!
Thanks, Donna! Hope I get to show it to you in person someday!
Looks fab! You’re so impressive.
You are so biased. But thanks. 🙂
Beautifully done Mary! I always had a hard time trying to make those particular cuts, but your idea will help me with future projects. Keep up the good work, looking forward to seeing the finished product.
I’m so glad it will help you! It did take some sittin’ and thinkin’, but was way worth it!
It looks to me as if fate has been on your side with this project. When one door closed, another–better option!–opened. Beautiful job, Mary!
Jan, I couldn’t agree more. That’s why, in those times when I ask myself, “What the heck am I DOING!?” I can relax and know that the Universe is working with me and I just have to sit back, relax and do my best, and have faith that it will happen as it should.