

This post is actually out of order, but I was so excited to show you my new backsplash, so I posted that one first. Before that, however, came one of the reasons I didn’t get that job done sooner: The Leak.
Now, admittedly, I’m a rank amateur at all this. I have yet to camp a single night in an RV in my life at this point, but I have been researching the lifestyle long enough to have learned one thing fo’ sho: When you own a camper, it’s not a matter of if it’s going to leak, but when. At some point, they all do.
After all, think about it: When you drive these vehicles over even normal roads, much less the kind of washboard roads you often find at remote campsites, you’re putting them through a constant barrage of low-level seismic stress every minute they’re rolling. That’s like having a constant 2-3 Richter scale level earthquake going on under your house a lot of the time. So yeah…things come apart now and then.
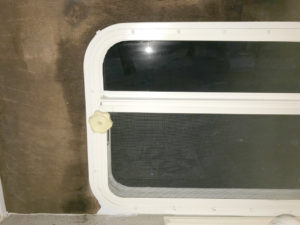
Replacing The Leaky Vent
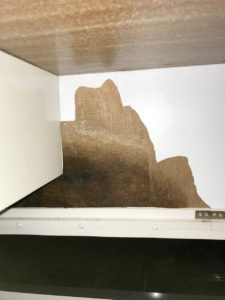
Stripping the wallcovering off the damp backsplash
However, what usually leaks is the roof, and the repair job usually entails putting a new rubber membrane and sealant up there. That was not the case with my rig, at least this time. No, instead, my leak was coming in through a void in the side of my trailer, around the stove vent.
The wall behind the sink and stove is still damp here.
It allowed water to soak the wall behind my kitchen sink and stove. You can see here how it rippled the original wallcovering, which I then had to strip off to allow the thin layer of veneer wood to dry before trying to install my backsplash tiles.

The final replacement vent clip worked great. Except that wasn’t the problem.
I originally thought the leak was from a missing flap retainer clip. You saw in an earlier post how I tried to fix it with a temporary, homemade clip. The clip worked great, and I even replaced that with a real clip from a hardware store. Problem is, it ended up that the water was not entering through the vent flap at all: It was coming in around the outside bezel of the vent assembly itself.
I discovered it because, upon close examination, I could see two pretty good cracks in both corners (sorry, I forgot to take a photo). But when I removed it to replace it with a new assembly, I was stunned to see that whomever replaced it (it HAD to be a replacement, because the original would have been done right) neglected, either through ignorance or laziness, to put a requisite bead of butyl tape between the bezel and the fiberglass side of the trailer.
That’s the RV equivalent of putting the valve cover back on your car’s engine without using a gasket. In other words, I’m amazed it didn’t leak long ago. You just don’t do something like that. I think the only thing that saved it was the immense bead of silicone caulk around the outside, so I was thankful for that.
At any rate, I finished that replacement before the rain started again last Sunday, and when I went out to check it on Monday, despite a nearly constant downpour overnight and that morning, it passed both the visual and the feel test. No water incursion to be found! I still need to put that finishing bead of silicone around the outside (I’m going to use white Flex Shot), but I took the time when I installed the butyl tape to mold the excess into a sort of seal that would shed the rain while it set up. I’ll let it sit a few more days, then do the silicone bead on Friday evening.
Exterior Lights
Another real issue with the outside mechanical status was the lights. When the trailer was delivered, I was assured that they all worked, and the seller had clearly been towing and using the rig, so I assumed all was well. I will admit, however, that I was less than thorough in fully inspecting every little detail. The day I’d gone to see it, it was about 15 degrees outside, with snow and a biting wind. I hadn’t been in a hurry to stay outside long in looking at it. I checked for the obvious things but failed to ask them to turn on the exterior lights, etc.
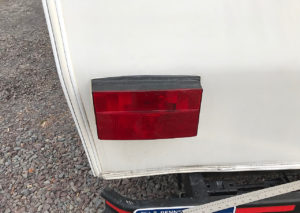
The driver’s side taillight showing the black duct tape.
So now I noticed that both taillights were wrapped in black duct tape. I’m not exactly sure why, because when I cut it off of the passenger side one, the lens was intact and fully fastened with the proper screws. I think now that there must have been some water incursion and the tape was supposed to minimize that. But what I found inside was what bothered me.
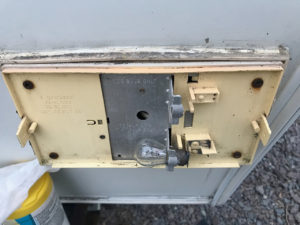
The interior of the passenger side taillight assembly revealed a missing lamp and corroded contacts.
Not only was the interior of the light full of dirt and displaying corroded contact wires, but one of the lamp bulbs was missing entirely. So the seller may have been driving it, but he was either missing his taillight or turn signal on that side. Not sure which, because it still hasn’t been hooked up to a live electrical harness. I only recently had that installed in the BumbleBeep Jeep. At least, as you can see here, there was no missing gasket material. In fact, there was an unsightly abundance.
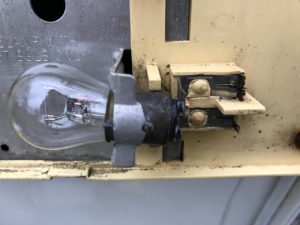
The top lamp was entirely missing, and the bottom one was corroded.
Upon closer inspection, I found that not only was the lamp missing, but the whole electrical contact point for that bulb was gone, as well. Plus, the bulb and contact points for the other lamp were pretty well corroded. :: sigh :: There would be no saving these lights. They would have to be replaced.

Taped back up, awaiting replacement
It would have to wait until the next weekend, when I would have time to go to the RV supply store to pick up some new taillight assemblies. Meanwhile, I taped the passenger side back up again, but this time used my lovely yellow duct tape. If it had to be taped, it was at least going to be pretty tape.
Next stop: Back inside
I am sooooo enjoying reading your saga ! Please make sure to plan a trip to the Dauphin Island Campground anytime May-October ! We stay there six months out of the year. Would love to go do some beach detecting with you !!
Barbara, thank you! Both for reading my blog and for your invitation. Normally, I will be staying in my home state area of PA from June-November, but perhaps I could stop to meet you at Dauphin Island in early May of next year, on my way back up from the desert. I am definitely planning a Southern loop that includes Alabama, but I will most likely be going through there around this time next year, and will be gone by May. Let’s chat about how we can make that work — I’m open to back-tracking a bit to go digging with you!
Awesome ! Sounds like a plan. For that matter, you’re welcome to stop by any time of the year. I actually prefer dirt digging to sand scooping ????
I’m so glad to see that you are making progress on your dream and I cannot wait to see you when you make your journey through Alabama. I’m so sorry to see you having to make all of these fixes, but very proud that you have the ability to do so on your own ????
Anita, I’m really looking forward to it, too!