
Having been out on the road a while now, I’m catching up on the remodel that got me here.
After I finished moving the 110-volt TV / 12V cigarette lighter (bayonet) style 12v outlet earlier, I decided immediately that I would add at least one more 110v and a whole bunch of 12v chargers and outlets later.
At the end of May, the time came to tackle the 110v project. This is the part of the trailer’s electrical system that is what we use in stationary, sticks-and-bricks houses, and that you are familiar with. This part of the system requires either electrical hookups at a campground, the use of a power inverter with a generator, or the use of a power inverter with a solar power generation system. At the time of this installation, I had a generator but hadn’t used it, and didn’t yet have an inverter, except what was built into the generator.
Innards first
I knew I’d need to get this 110v wiring finished before I got everything painted, because electrical installation means a lot of bending over and leaning up against woodwork, and I didn’t want to mess up any fresh paint. And I certainly didn’t want to have to rip up something I’d already painted to make access ports or something like that.
This was the biggest project I’d tackled so far, not just because the amount of electrical I wanted to add was significant, but also because each of the steps entailed several previous steps to get that one ready to happen.
This meant the project also required a great deal of forethought and planning—not exactly my forté. But I managed to pull it off, and that alone was worth the effort; proving to myself that when I really need to be a planner, I can do so with success.
For purposes of explanation here, I’m going to split the project between 110v, 12v, and wall sconce installation. In actual chronological order, these phases overlapped a good bit, which I’ll explain as I go along. So, in some of the photos in this post, you’ll see some items I haven’t explained yet. No worries, I’ll get to those eventually.
I started on one sweltering Saturday.
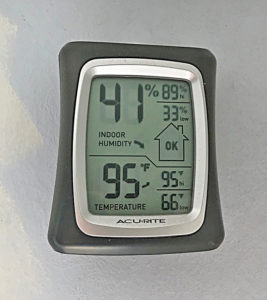
The first thing I should mention is that, although the humidity hadn’t yet reached the insane levels it stayed at all summer, the heat was definitely here. We had no appreciable spring in 2017 — within two weeks, we went from the 60s to the 90s, and it never left that level all summer.
So here’s a picture of my trailer’s interior thermometer/hygrometer, to give you an idea of the conditions I was working in. Remember, at this point, I had no battery, so no fans or air conditioning.
Area 1: Foredeck
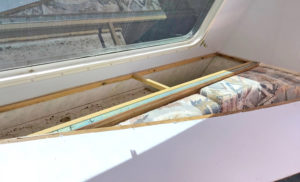
The front of my rig came with a narrow (about 11 inches) ledge running the entire width of the trailer, under the front window. It looked okay, but when I leaned on it the first time, the top felt flimsy and really flexed. Between its age and the fact it had been beneath a leak years ago before it got repaired, I felt that the top board—a very thin 1/8″ luan—had just seen better days.
Old ledge, port side. You can see the warping at the corner, and the existing 110v outlet.
It was dried out and starting to deteriorate into dust, and it was visibly sagging. It needed to be replaced with a more sturdy surface, and I chose a 3/16″ luan for its strength while still being lightweight.
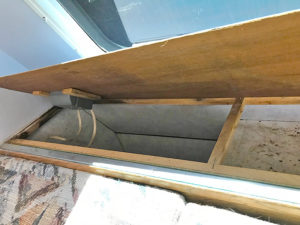
Old ledge, starboard side. I was to discover that this monolithic shelf hid valuable space that wasn’t being used.
Since I was going to be doing some wiring underneath, now was the time. When I pried up the cheap staples holding it down, I was pleasantly surprised to find that there was some hidden empty space on either side.
You can see what the starboard side looked like once the flimsy shelf top was removed.
The center area was pretty shallow, only about 4″ deep, since the propane tanks were mounted underneath, accessible by an outside hatch door. That shallow area above would make a great console to locate both 110v outlets and both 12v receptacles. They would be central to, and easy to reach from, all my computers and peripherals in the office area, which I intended to build over top of the dinette cushions.
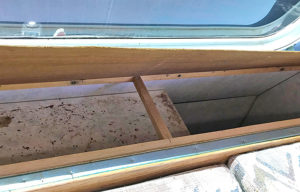
Inside the ledge, port side. You can see the large area of empty space that was being wasted.
Empty spaces on either side ran clear down to the bottom of the rig, which means they opened to some of the “basement” storage cubbies. I didn’t want to leave that open all the way through, because I didn’t want the inevitable dust and cold to sift up through the opening during travel.
The other side of the ledge, underneath
So I also used some of the 3/16″ luan to fashion a couple of hard bottoms, and installed those above a halfway structure frame in the bottom.
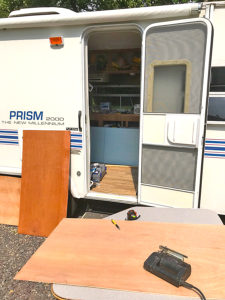
I used the dinette table as a workbench, and ran my electric saw and other power tools off a small 21v-to-110v converter plugged into my Jeep’s cigarette lighter outlet. Figured I might as well get used to being self-contained, since that’s how I’d have to handle any work projects on the road.
Once I got the old top removed, I used the trailer’s dinette table as a workbench to measure out and cut the luan for the replacement shelf. I cut it into three lengths. The first was for the center console, which would be permanently screwed in place to secure all the electrical outlets.
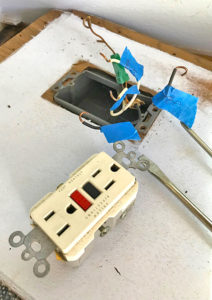
The existing outlet removed and wires labeled.
Before installing anything new, I needed to removed the existing 110v outlet and move it from far port side to the port end of the center console. I had to pay close attention to which wire was which, because in older RVs, wiring colors are inconsistent. You can see the blue painter’s tape I used here to make labels for the wires as I disconnected them. I knew I would have to extend them with additional wire to reach the center.
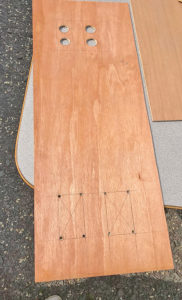
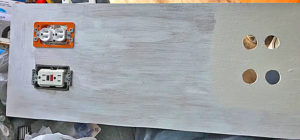
The measured and mapped new ledge top for the center console. I still need to cut the 110v outlet holes, but drilled the 12v outlets with a 1″ hole saw.
To keep things simple, I painted the new top before installing it. Then I cut out a space for the old 110v outlet and a new 110v GFCI outlet in the center console top. I’ll show how I put in the 12v outlets in a separate post.
Along with using the dinette table, I found other ways to use existing trailer features to help me work. Here, you can see that the front window ledge made a great temporary storage place for all the installation screws!
It’s amazing how creative you can get when you need a place to put things while you work!
When choosing an additional 110v outlet, I was careful to pick one that was easy to hook up. I had an issue identifying the positive and negative posts on it, and was glad I’d made sure to choose one that had a note on back about where to find installation instructions. I visited the website listed there, and downloaded a PDF of the instructions to my iPhone, and read them off there as I worked. Perfect!
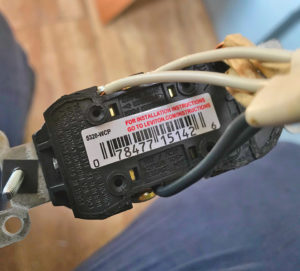
The back of the new 110v outlet carried a URL I could visit for installation instructions.
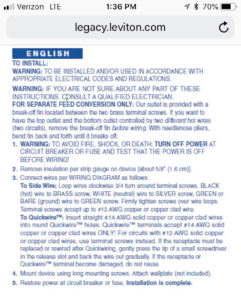
These are the instructions I found online. It’s a screenshot from my phone.
Both outlets installed and board partially painted
When I got both 110v outlets installed, I painted the board partially on the port side and fully on the starboard side, so I wouldn’t have to do any intricate painting around the smaller 12v outlets. Once it was installed, I would give it several coats on the rest to a finished state.

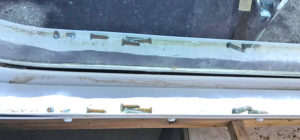
110v cables properly joined
The next step was to bundle all the heavier 110v cables together, attach them with wire nuts, and run them against the back wall of the port side compartment, so they would still allow full use of that space for storage.
At this point, because I didn’t want to have to remove the center console top once screwed in place, I also installed the 12v outlets on the starboard side. It was a simple matter of dropping the outlets themselves into the pre-drilled holes, then attaching the escutcheon around them for a finished look. I ran those wires through the same chases I had created for the 110v cables, because they were all heading back to the same fuse box amidships.
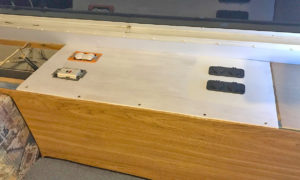
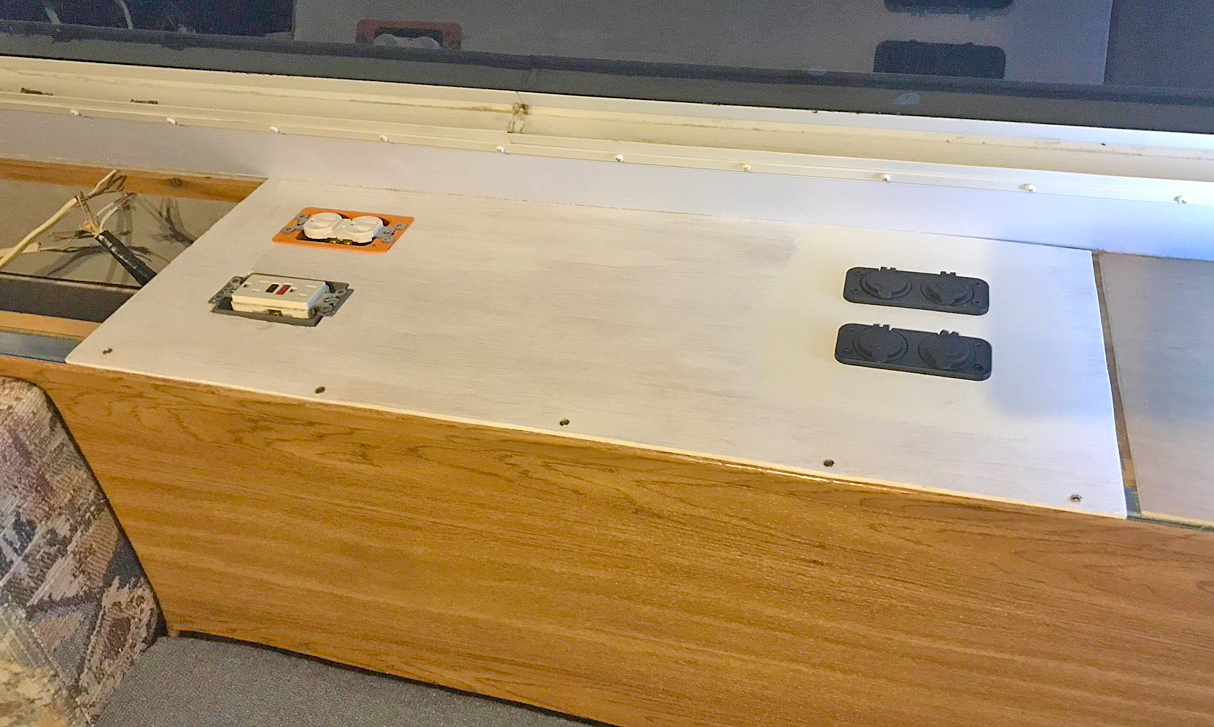
Finished center console
Once I got that done and the paint had dried, I screwed the finished installation board down on top of the center console, and was pleased with how it looked. I also knew it would be an efficient power center for my work needs.
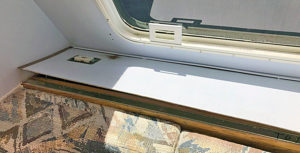
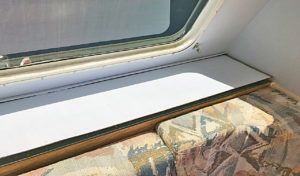
This shows the starboard ledge compartment lid with finished handle in place. You can’t see the magnetic catch underneath (this was intentional), and it’s not painted yet, but you get the idea. It has worked exactly as planned, and I’m very pleased with this design.
The two end compartments would be topped with the remaining lengths of 3/16″ luan, to which I affixed oil-rubbed bronze handles on top and a magnetic catch underneath in the back. These would not have hinges, so I could easily lift them off as needed to put or take things from storage, because I knew I’d be using them a lot.
Recent Comments