

Now that we’ve covered potential disaster scenarios and the documents and first aid kits you should have with you, this last entry in my Disaster Preparedness in an RV series will cover how to put together a Go-Bag or Bug-Out Bag.
Go-Bag vs. Bug-Out Bag
They’re basically the same thing, but while the Go-Bag was named for the purpose of having all important items ready to go in case of more common local emergencies for the general public, the Bug-Out Bag was named by survivalists and preppers as the kit one would take along in the eventuality of a national or global level event, such as a nuclear holocaust, total economic collapse, widespread political chaos or a zombie apocalypse.
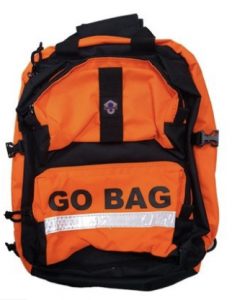
The basic difference would be that while the Go-Bag is created with the purpose of short to medium term use, a Bug-Out Bag is developed with the idea that it will be the last thing you’re able to take from a home you may or may not ever be able to return to. Here’s what a typical Bug-Out Bag might look like:
With that happy comparison out of the way, let’s take a look at what you may want to include in your go-bag for the far more likely severe weather or natural disaster, or an accidental hazardous substance release on a local basis. Remember that this is for the use of full or part-time RVers, so there may be some things we want to include that wouldn’t be appropriate for a sticks-and-bricks dweller, and vice-versa.
Choosing your go-bag
You first want to get a sturdy bag of some sort. It could be a duffel, a backpack, a see-through panel pack; doesn’t really matter exactly the design, as long as it’s easy to carry and holds everything you think you’ll need.
You also want to remember that it’s going to be riding with you wherever you go, and will likely be moved now and again, so don’t cheap out and buy something thin and wimpy. Get something with some substance to the material, so it’ll hold up. The last thing you want to worry about in a disaster is whether or not you can count on your gear to hold up.
Strength and ruggedness in duffels is usually characterized by the thickness (denier count) of the fabric, and what type of fiber is used. The serious ones include carbon fiber or what’s called ballistic nylon, Cordura or Kevlar. Water resistance is a desirable characteristic in your Go-Bag as well, since it’s highly likely you may encounter wet weather when you need to use it.
If you don’t have a big budget, shop at thrift stores, Goodwill, the Salvation Army, etc. These places always have a plethora of different types of duffels and backpacks. Even if you have to start with a less-rugged model than you’d like, something is better than nothing. You may consider shopping at a military surplus store, which always have the coolest types of bags and packs, and they’re usually really affordable, new and built to withstand the worst kind of treatment. Don’t forget about places like eBay and Facebook Marketplace for great deals on used and sometimes even new stuff.
Types of Go-Bags
Here are a few different types you may want to consider:
Remember that you may very likely end up on foot at some point during a disaster evacuation. Be sure that if you can’t imagine carrying it in your grip for long distances, you get one with a shoulder strap, waist strap, or a backpack type model. One main feature I find important and no longer optional is nylon zippers, as opposed to metal ones. The heavy duty ones will stay together without getting stuck and don’t rust, which can be an issue in wet weather.
I personally prefer bags with lots of pockets and zippers, because I like the idea of isolating small items so they don’t slip out and get lost when removing a larger item. I also like to keep gels and liquids and foods away from other items in case they spill or rupture. That just creates a mess you don’t need on top of everything else that goes on during an emergency.
Some features that are not necessary but that can really add to the functionality of your bag are
- Key fob clip or hook to secure your vehicle and rig keys. These are most secure if located inside the bag, but you may prefer a more easily accessible outside location.
- Adjustable, removable shoulder strap with padding
- Exterior mesh pocket for water bottle
- Detachable smaller pack that can be clipped to your belt or carried with its own strap for short trips without your full Go-Bag
- See-through panel that lets you know immediately what’s inside. I recommend these only for smaller packs you may carry inside a larger one, because whatever you can see immediately, so can other people. And unfortunately, that can be a problem if someone you encounter is desperate.
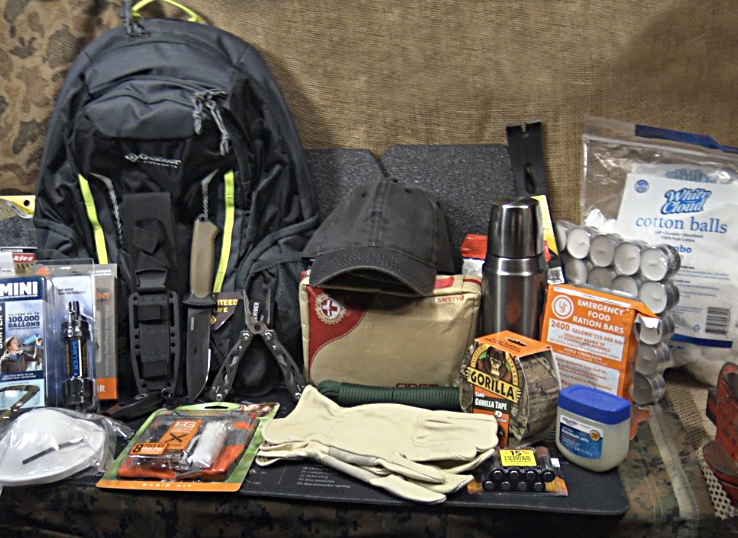
What to put in your go-bag
You need to think about the kinds of things you’ll need to survive for at least three days, and more like a week. Depending on your individual needs, this may include a few changes of clothes, some eating utensils, food, etc. If you are on prescription meds, make sure those go with you. If you take insulin and don’t have one of the newer cool packs, you’ll need to remember to grab some frozen gel packs from your RV freezer before you leave the rig.
It would be a good idea to write reminder notes about things like this ahead of time, and leave them inside the bag, on top of the contents, to be sure you see it when doing your final packing. You’ll more than likely be in a big hurry then, so make the note large and easy to see.
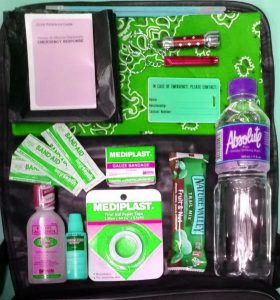
Sample Go-Bag contents
Instead of making a huge list here of other things you need to think about including, I’m instead going to link over to several places that are far more knowledgeable about this kind of thing than I am. I know what is in my own go-bag, but these folks have thought about this a great deal more than I have. So why not let the experts teach you, while keeping this post from becoming 80 screens long?
Here are those links:
Wikihow – Very detailed and comprehensive
BugOut Bag Academy – Another detailed how-to
Skilled Survivor – This guy seems a little over-zealous, but it’s solid info.
Uncharted Supply Co. – The most comprehensive List & how-to I’ve found
What to do if you really need to leave
In the unlikely event that you actually need to use your go-bag to get out of the way of a disaster, or evacuate a disaster zone after something bad has already happened, it can be a jarring experience. Don’t count on staying calm and collected. You probably will, but you need to hope for the best and plan for the worst.
So, imagine that you may feel a bit scattered and out-of-sorts as you get ready to leave your rig behind and skedaddle for at least several days. How will you make sure you take everything you need to, and as little as possible that you don’t?
15 minutes: Grab and Go!
FEMA recommends planning to have no more than 15 minutes to get your stuff together and move out. That’s pretty daunting when you think about it, but I’ve personally talked with survivors of the wildfires out West who had less than that. So have the majority of your stuff together in your go-bag, and if you need to make a list for the last-minute things, do it. But make it short and easy to follow. A few suggestions for this list:
- Vehicle and RV keys, even if you’re walking out or being evacuated in official vehicles. You’ll need them when you return.
- Prescription medications for humans and pets
- Your wallet or handbag (make it a small purse, nothing bulky)
- Your must-have important documents (discussed in Part 1 of this series)
- A carrier for your pet
- Whatever else you might need that you can’t pack ahead of time
A note about clothing
One thing to seriously consider: It will be tempting to relegate your least favorite clothes to the go-bag, because let’s face it: They’re just gonna sit in there most—if not all—the time. At least that’s the hope. And I get that—no one wants to waste your favorite clothes in a kit that may never get used. Besides, fashion isn’t rewarded in disaster clothing; practicality, functionality and comfort are.
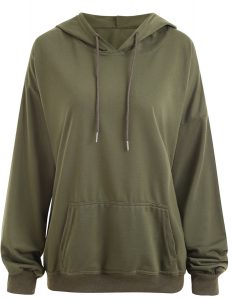 But do take a moment to imagine that whatever you pack, for any number of reasons, you may end up wearing longer than you’ve ever worn a single outfit—or a very limited few—in your whole life. So no one says pack your favorite clothes, but do pack garments that are comfortable and allow you to be really physically active and flexible.
Comfort means soft fabrics that are lightweight, absorb sweat well, and will keep you cool or warm enough. You may need to change the clothes out twice a year as the major seasons change. Active and flexible means garments that are baggy and roomy, with no decorations that hang down (fringe, lace, flaps, string) and might get you caught or hung up on something.
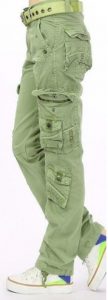 And pockets are a good idea—they may be the only way you can carry small items like a compass and pocketknife that you’ll really need. Think cargo pants or shorts, thick-soled hiking boots that will protect your whole foot, and layers that you can put on and take off as needed.
You have no idea what may be required of you once a disaster hits. That’s why they make thriller movies out of these scenarios—they often call on people to do things they never thought they could or would. So comfortable, flexible clothing is a must. You don’t want to survive the original threat, such as a tornado, only to drown on your way to safety because your clothing was binding and you couldn’t quite make that leap from a boulder across a stream swollen with rainwater.
The most comfortable, flexible clothing is obviously workout gear, and that can be expensive. If you don’t want to spend a mint on clothes that in all likelihood won’t get worn, hit your local thrift shops, flea markets, Facebook marketplace and eBay. You’ll be amazed at the deals you can find on technologically advanced clothing.
And whether or not you decide to switch out your go-bag clothes seasonally, at the very least, open up the bag and launder the clothes at least annually. You don’t want to open it up when you really need it, only to find a stinky, moldy mess inside. Because you WILL have to wear what you find, regardless. So take a few minutes to make sure it’s still wearable. This is particularly true if you’ve had significant change in clothing size since you last visited your go-bag.
Other go-time considerations
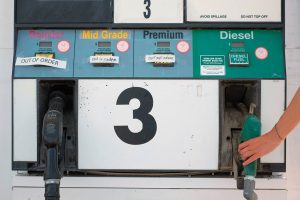
- Always keep your vehicle’s fuel tank at least half-full. This is something I hope you do anyway, as a full-time RVer who thinks ahead. And it goes double for those whose rigs burn diesel. It can be tricky during the best of times to find stations that sell diesel, so imagine how difficult it might become during a disaster. During a severe weather event or disaster situation, gas stations could experience power outages, run out of fuel or have long lines you just can’t wait for. It could take a long time to find or get to an operational gas station, so having fuel already in your tank lets you get on the road and out of harm’s way without delay.
- Know the travel routes you’ll need to take. If you’re evacuating in the event of something like a tsunami or hurricane, there may be designated evacuation routes. As soon as you know your area may be in the path of such a storm, find out what they are from your camp host, local law enforcement or by going online. Knowing these routes in advance will get you out of the area faster, and give you more confidence in your ability to do so safely. Many RV resorts and campgrounds keep this info handy, and in long-lead-time events such as hurricanes, you’ll have time to inquire about it and find it yourself if they don’t.
- Establish a communication plan. Leaving your campsite in a hurry may lead to confusion for family members with you and those out of the area, maybe even among other campers around you. It helps to designate one person—a family member, trusted friend, or coworker—outside the affected area, whom everyone knows to reach out to in case of an emergency.
This person can keep track of who has or has not evacuated, and where each person may have gone in case your group or family is unable to stay together. Incorporating social media and texting into this plan can make it even easier. Twitter is a more immediate channel, and Facebook offers its Safety Check feature to report yourself safe to Friends.
Remember that even when voice service isn’t working on cell towers, often data services are still operational, so SMS or text messaging is the way to go for direct communication if you can.
I hope you’ve found this series helpful and not unduly scary. My experience is that the more information you have about anything, the less scary and intimidating it becomes. That’s because knowledge is power, and feeling like you’re exercising what control you do have, in a situation that seems really out of control, is both calming and confidence-building. I performed a number of evacuations during my time in emergency management, and it really does seem to be the case. I welcome any questions or comments (below), and I will revisit this section occasionally to update as needed.
Recent Comments